问题描述
在安装gentoo的时候,一切都安装完,在执行reboot这一步之后,无法正常启动grub
## 问题原因 相信你在执行reboot的时候,关机信息中看到了,系统无法umount cdrom
## 解决办法 改reboot为shutdown -h now,然后手工将安装光驱从virtualbox中删掉,再重新启动gentoo
在安装gentoo的时候,一切都安装完,在执行reboot这一步之后,无法正常启动grub
## 问题原因 相信你在执行reboot的时候,关机信息中看到了,系统无法umount cdrom
## 解决办法 改reboot为shutdown -h now,然后手工将安装光驱从virtualbox中删掉,再重新启动gentoo
一只脚尚驻在过去,一只脚已踏入未来,中国是全世界最盛大的开端,也是最伟大的转折。 * * * 1989年TM是一场悲剧,但也是一次转折点。它是由党内的保守分子和改革人士之间的巨大 裂痕所导致的。保守分子赢得了这场战役,但是却输掉了整场战争。作为TM事件的后果, 党加速了私有化和市场改革的进程,因为党的威信已经被打破,只能通过快速提高人民 生活水平来重建。
在nginx的配置项里有try_files这一项,查了一下,是nginx0.6.36后增加的功能, 用于搜索指定目录下的N文件,如果找不到fileN,则调用fallback中指定的位置来 处理请求。利用它可以代替部分复杂的nginx rewrite语法 * * * try_files file1 [file2…fileN] fallback 默认值:无 作用域:location
先看这段代码: <?php class A{ public static funciton create(){ return new static(); } public static function createself(){ return new self(); } }
class B extends A{

}

class C extends A{

}
var_dump( B::create() );
var_dump( C::createself() );
?>
得到结果如下 object(B)#1 (0) { } object(A)#1 (0) { } 原因是self关键词的执行环境是定义self的类,而不是调用它的对象, static与self的区别就是它的执行环境是调用它的对象。
一直想抽时间把cocos2dx入门这自己的经历写一下,终于周末啦!
首先说明,本人win7用户,IDE是vs2010,编译环境是win32,这篇文章是介绍如何在vs2010中开始你的第一个cocos2dx+lua项目的
前提是你必须安装了vs2010哈!
第一步,下载cocos2dx,下载后解压,这个放在哪个目录都没关系。
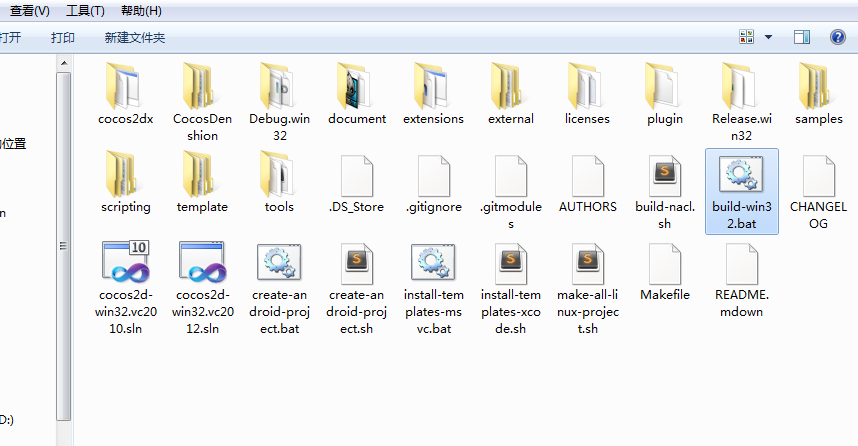
第二步,安装cocos2dx工程模板,双击解压后目录下的 install-templates-msvc.bat 这个文件,如下图

第三步,打开你的vs2010,文件-> 新建项目,这时候你会看到,已安装的模板一栏里有Cocos2d-win32 Application 这个模板,并且有cocos2dx的经典图标在那!
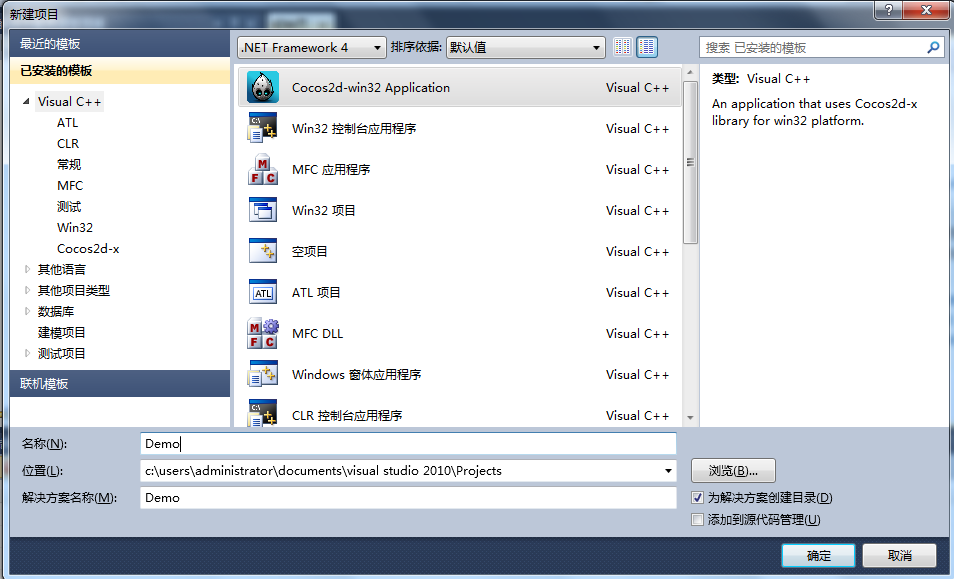
这时候,你需要输入名称,然后点确认.
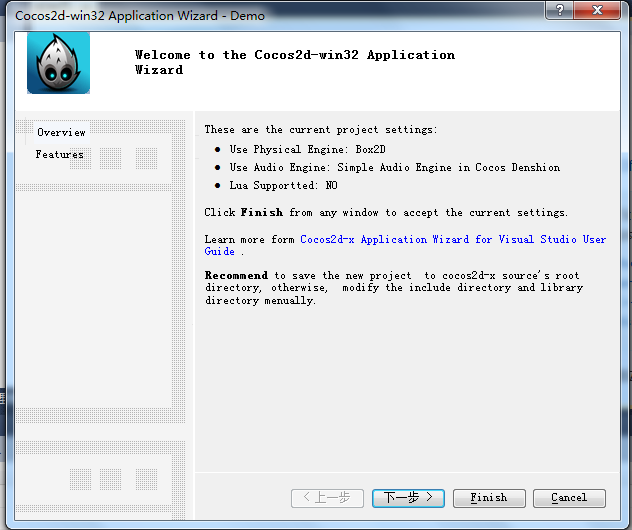
点击下一步
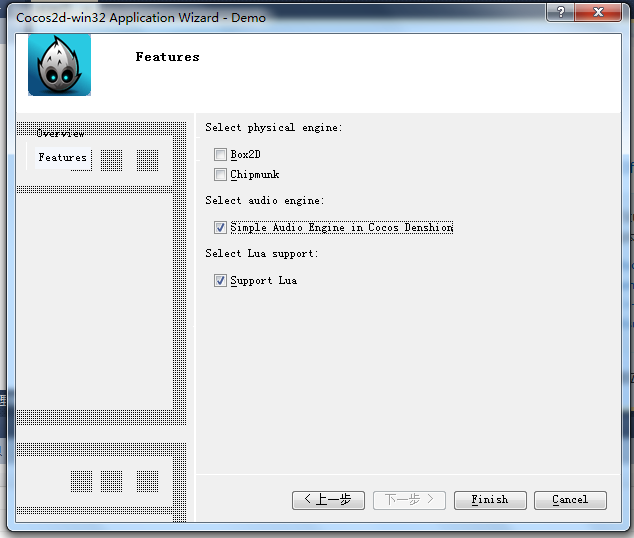
选择引擎,这里选择audio和lua引擎
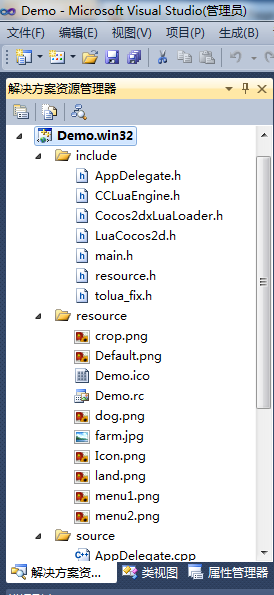
然后就能看到刚刚创建的项目了:
这时候如果我们点debug按钮,项目是不能运行起来的,因为它缺少一些库
第四步,运行cocos2dx目录下,也就是之前解压的目录下的build-win32.bat,等运行完后,会在当前目录下生成Debug.win32这个目录
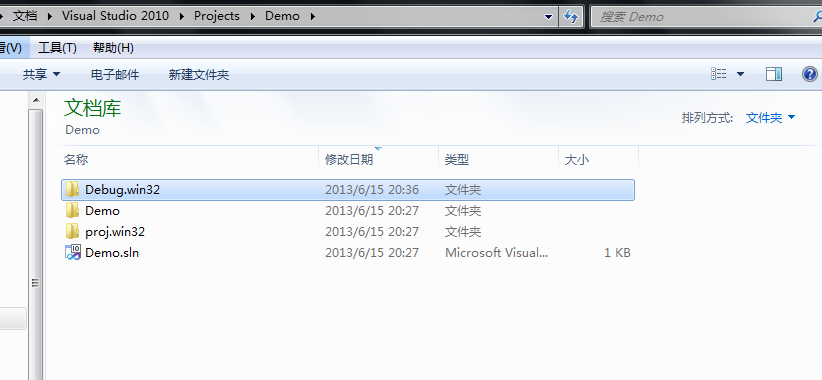
 然后找到Demo项目下的Debug.win32,如果没有这个目录的话,执行一下Demo项目的Debug就有了(尽管执行报错),但是会生成这个目录:
 然后我们把cocos2dx/Debug.win32 这个目录下的这些文件拷贝到 Demo/Debug.win32 下
glew32.lib
libcocos2d.lib
libCocosDenshion.lib
liblua.lib
lua51.lib
pthreadVCE2.lib
然后我们把cocos2dx/Debug.win32 这个目录下的这些文件拷贝到 Demo/Debug.win32 下
glew32.lib
libcocos2d.lib
libCocosDenshion.lib
liblua.lib
lua51.lib
pthreadVCE2.lib
glew32.dll
libcocos2d.dll
libCocosDenshion.dll
libtiff.dll
lua51.dll
pthreadVCE2.dll
zlib1.dll 有点多,需要一个一个拷贝过去,如果缺了其中一个的话,会报错 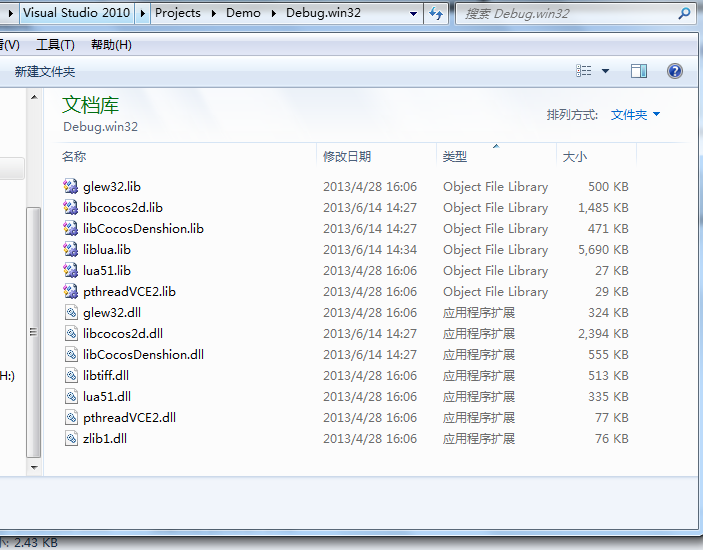 第五步,在Demo/Demo目录下创建Libs目录,把cocos2dx目录下的cocos2dx;CocosDenshion;extensions;以及cocos2dx/scripting 目录下的lua 都拷贝到新建的Libs中来。 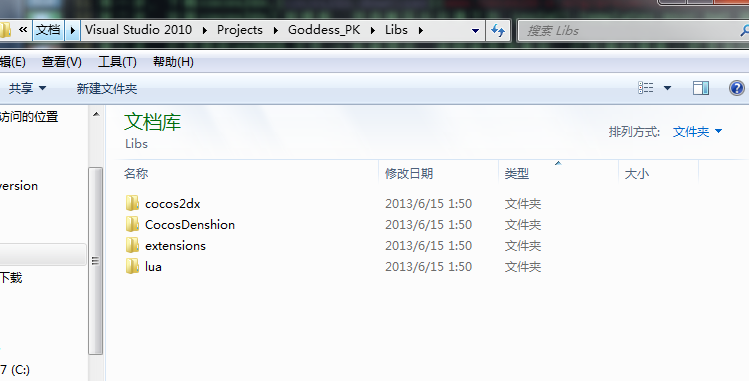 第六步,配置包含路径,项目上点右键 -> 属性 -> C/C++ -> 常规-> 附加包含目录 ,删除它原来的那些,将下面这些加入 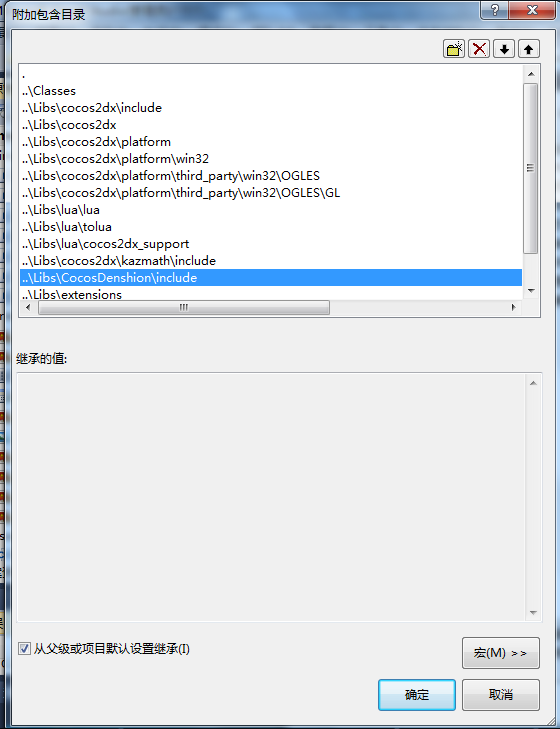 再打开链接器的输入,加入lua51.lib  设置完后点击应用,然后就可以运行了,结果如下,瞧!一个小农场游戏: 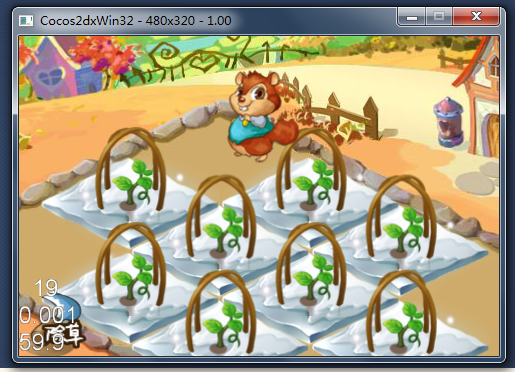
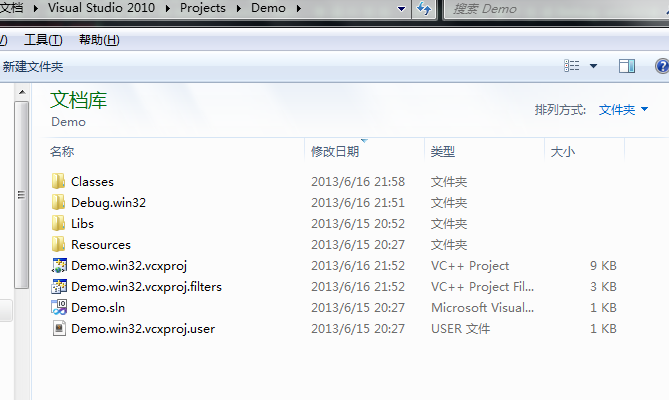
当然,还没完,因为我们不仅仅是要运行第一个cocos2dx + lua项目,我们是要改它生成的不美观的目录结构:
 首先,删掉Demo目录下的proj.win32文件夹,因为里面什么东西都没有!
然后在项目的资源管理器面板中,在Demo.rc;Demo.ico;Demo.png这三个文件上点击右键-> 移除-> 删除;
再删除Demo/Demo/proj.win32下的res文件夹.
将main.h;main.cpp这两个文件移动到Demo/Demo/Classes 文件夹中.退出vs2010.
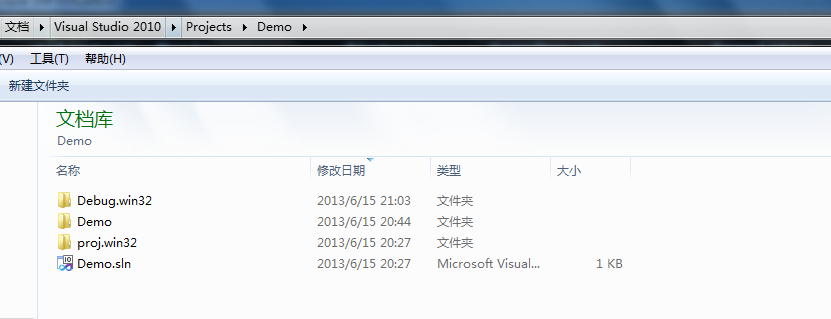
将Demo.win32.vcxproj;Demo.win32.vcxproj.filters;Demo.win32.vcxproj.user 三个文件移动到Demo目录下;删除Demo/Demo/proj.win32这个文件夹
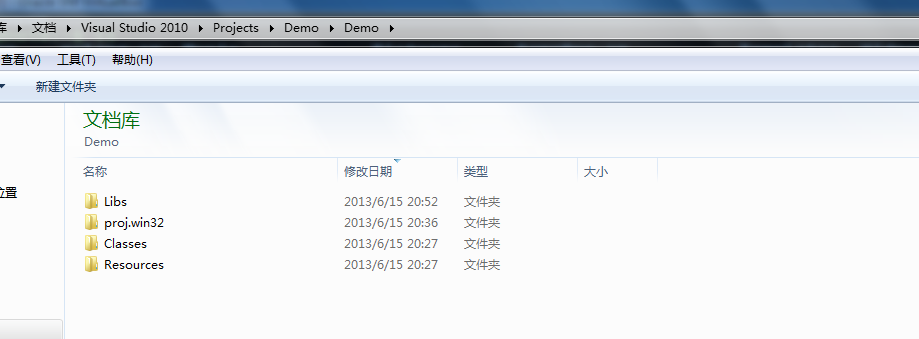
将Demo/Demo下的Classes;Libs;Resources三个文件夹移动到Demo目录下;并删除Demo/Demo这个目录.
修改完之后,整个项目目录结构是这样子的:
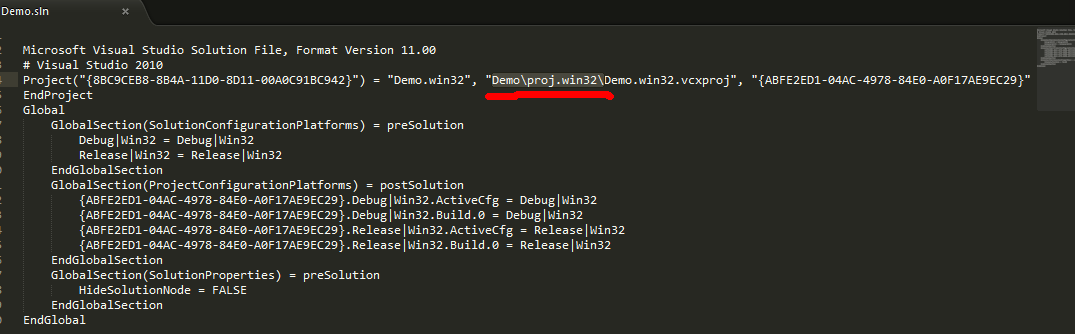
然而这时候是无法打开项目的,打开Demo.sln文件编辑,并删掉这一部分:
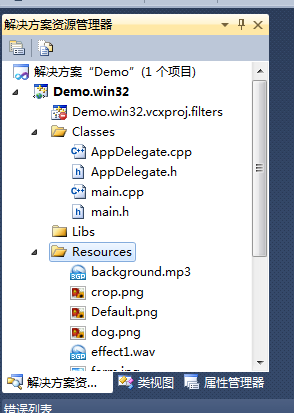
删除Demo.win32.vcxproj.filters这个文件,让我们来重新设置filters过滤器,删除之后打开Demo.sln。移除项目中的所有文件:
然后依次按照我们项目中Classes;Libs;Resources这样的目录重新设置filters,分别用点击右键 -> 添加筛选器;右键 -> 添加现有项, 将我们的文件导入:
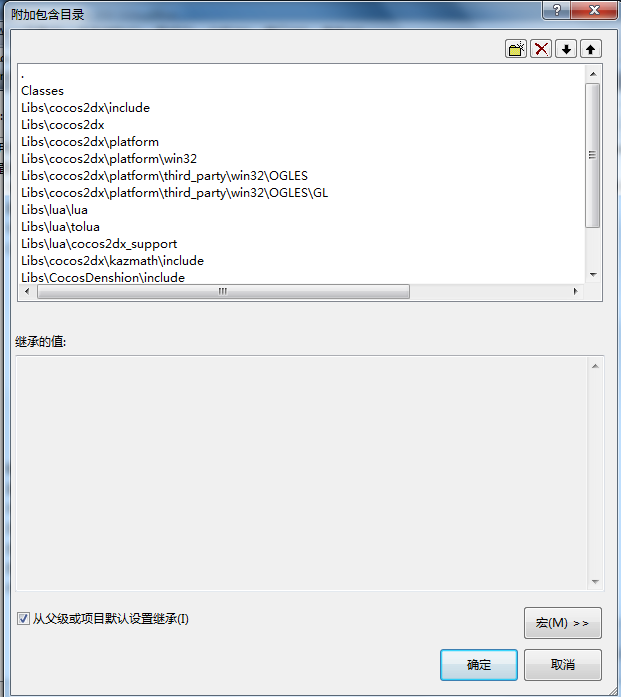
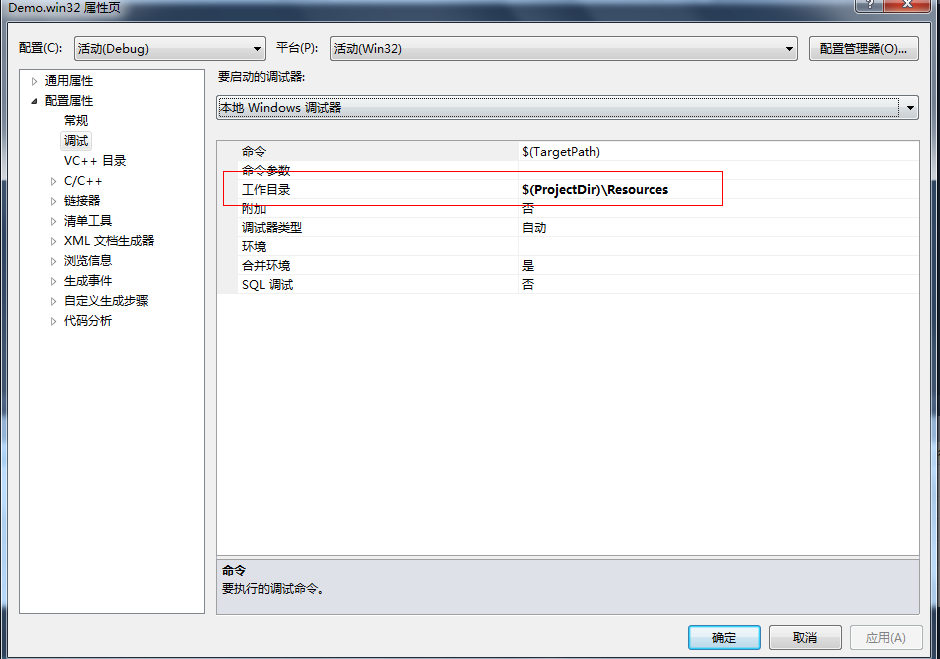
由于采用的是相对路径,所以附加目录这里得改一下啦:
还有这里,我习惯把中间目录跟Debug目录放到一块儿去

这时候改完之后发现跑不动了,因为找不到Resources目录
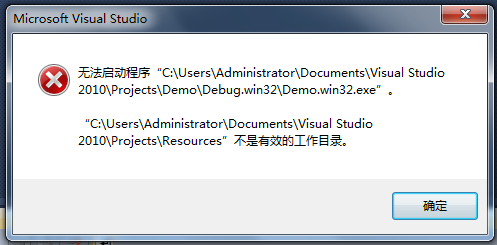
看到没,在这里设置的
好了,修改完之后,又能够看到我们的农场游戏了:

这时候的项目组织方式,已经按照我自己的想法完全改了:
按照这些方法,你完全可以以你自己的方式去组织项目结构
ubuntu上面是默认装了gdb的,输入
gdb -v
查看gdb的版本信息
zhang@note:~/test_make$ gdb -v
GNU gdb (Ubuntu/Linaro 7.4-2012.02-0ubuntu2) 7.4-2012.02
Copyright (C) 2012 Free Software Foundation, Inc.
License GPLv3+: GNU GPL version 3 or later http://gnu.org/licenses/gpl.html
This is free software: you are free to change and redistribute it.
There is NO WARRANTY, to the extent permitted by law. Type “show copying”
and “show warranty” for details.
This GDB was configured as “i686-linux-gnu”.
For bug reporting instructions, please see:
http://bugs.launchpad.net/gdb-linaro/.
上一篇介绍了Makefile,在上一篇的例子里,我们在Makefile中加入-g编译选项,使Makefile文件如下:
CFLAGS = -g
main:main.o test1.o test2.o
gcc -o $@ $^
..c.o:
gcc $(CFLAGS) -c $<
然后先删了老的main* 和*.o文件
zhang@note:~/test_make$ rm main
zhang@note:~/test_make$ rm *.o
好了,重新编译
zhang@note:~/test_make$ make
cc -g -c -o main.o main.c
cc -g -c -o test1.o test1.c
cc -g -c -o test2.o test2.c
gcc -o main main.o test1.o test2.o
zhang@note:~/test_make$
编译完后运行gdb
zhang@note:~/test_make$ gdb ./main
GNU gdb (Ubuntu/Linaro 7.4-2012.02-0ubuntu2) 7.4-2012.02
Copyright (C) 2012 Free Software Foundation, Inc.
License GPLv3+: GNU GPL version 3 or later http://gnu.org/licenses/gpl.html
This is free software: you are free to change and redistribute it.
There is NO WARRANTY, to the extent permitted by law. Type “show copying”
and “show warranty” for details.
This GDB was configured as “i686-linux-gnu”.
For bug reporting instructions, please see:
http://bugs.launchpad.net/gdb-linaro/…
Reading symbols from /home/zhang/test_make/main…done.
(gdb)
输入命令
(gdb) list
1 #include “test1.h”
2 #include “test2.h”
3
4 void main(int argc, char **argv)
5 {
6 test1_print(“Hello “);
7 test2_print(“World !”);
8 }
(gdb)
Line number 9 out of range; main.c has 8 lines.
(gdb)
注意,这里我试过,如果Makefile里面的-g参数不写,或者写得不正确,list的时候会报:
(gdb) list
No symbol table is loaded. Use the “file” command.
(gdb)
如果只想列出2-9行之间的代码
(gdb) list 2,9
2 #include “test2.h”
3
4 void main(int argc, char **argv)
5 {
6 test1_print(“Hello “);
7 test2_print(“World !”);
8 }
如果只想列出某个函数
(gdb) list test1_print
1 #include “stdio.h”
2 #include “test1.h”
3
4 void test1_print(char *print_str)
5 {
6 printf(“This is test1 print %s \n”, print_str);
7 }
(gdb)
为了能够下断点查看变量值,我们改下main函数
void main(int argc, char **argv)
{
char msg1[128] = “Hello “;
char msg2[128] = “World !”;
test1_print(msg1);
test2_print(msg2);
}
然后
zhang@note:~/test_make$ make #编译
cc -g -c -o main.o main.c
cc -g -c -o test1.o test1.c
cc -g -c -o test2.o test2.c
gcc -o main main.o test1.o test2.o
zhang@note:~/test_make$ gdb ./main
GNU gdb (Ubuntu/Linaro 7.4-2012.02-0ubuntu2) 7.4-2012.02
Copyright (C) 2012 Free Software Foundation, Inc.
License GPLv3+: GNU GPL version 3 or later http://gnu.org/licenses/gpl.html
This is free software: you are free to change and redistribute it.
There is NO WARRANTY, to the extent permitted by law. Type “show copying”
and “show warranty” for details.
This GDB was configured as “i686-linux-gnu”.
For bug reporting instructions, please see:
http://bugs.launchpad.net/gdb-linaro/…
Reading symbols from /home/zhang/test_make/main…done.
(gdb) list #列出代码
1 #include “test1.h”
2 #include “test2.h”
3
4 void main(int argc, char **argv)
5 {
6 char msg1[128] = “Hello “;
7 char msg2[128] = “World !”;
8 test1_print(msg1);
9 test2_print(msg2);
10 }
(gdb) break 7 #在第7行的位置下断点
Breakpoint 1 at 0x804847c: file main.c, line 7.
(gdb) run main #执行调试
Starting program: /home/zhang/test_make/main main
Breakpoint 1, main (argc=2, argv=0xbffff2c4) at main.c:7
7       char msg2[128] = "World !";
(gdb) print msg1                    #查看断点处变量msg1的值
$1 = "Hello ", '\000' <repeats 121 times>
(gdb) continue                      #继续往下执行
Continuing.
This is test1 print Hello
This is test2 print World !
[Inferior 1 (process 3270) exited normally]
(gdb) 看吧,这就是用gdb调试一个程序的完整过程,简单吧?:-) 附上常用命令:
小结:常用的gdb命令
backtrace 显示程序中的当前位置和表示如何到达当前位置的栈跟踪(同义词:where)
breakpoint 在程序中设置一个断点
cd 改变当前工作目录
clear 删除刚才停止处的断点
commands 命中断点时,列出将要执行的命令
continue 从断点开始继续执行
delete 删除一个断点或监测点;也可与其他命令一起使用
display 程序停止时显示变量和表达时
down 下移栈帧,使得另一个函数成为当前函数
frame 选择下一条continue命令的帧
info 显示与该程序有关的各种信息
jump 在源程序中的另一点开始运行
kill 异常终止在gdb 控制下运行的程序
list 列出相应于正在执行的程序的原文件内容
next 执行下一个源程序行,从而执行其整体中的一个函数
print 显示变量或表达式的值
pwd 显示当前工作目录
pype 显示一个数据结构(如一个结构或C++类)的内容
quit 退出gdb
reverse-search 在源文件中反向搜索正规表达式
run 执行该程序
search 在源文件中搜索正规表达式
set variable 给变量赋值
signal 将一个信号发送到正在运行的进程
step 执行下一个源程序行,必要时进入下一个函数
undisplay display命令的反命令,不要显示表达式
until 结束当前循环
up 上移栈帧,使另一函数成为当前函数
watch 在程序中设置一个监测点(即数据断点)
whatis 显示变量或函数类型
关于Makefile的介绍,不多说,详情见百度百科:
Makefile
下面就来看看Makefile的作用
假如我们的项目有main.c; test1.h; test1.c; test2.h; test2.c 这几个文件如下:
main.c
/* main.c */
#include “test1.h”
#include “test2.h”
int main(int argc, char **argv)
{
    test1_print("hello ");
    test2_print("world !");
} test1.h
/* test1.h */
#ifndef _TEST_1_H
#define _TEST_1_H

void test1_print(char *print_str);
#endif test1.c
/* test1.c */
#include "test1.h"

void test1_print(char *print_str)
{
    printf("This is test1 print %s \n", print_str);
} test2.h
/* test2.h */
#ifndef _TEST_2_H

void test2_print(char *print_str);
#endif test2.c
/* test2.c */
#include "test2.h"

void test2_print(char *print_str)
{
    printf("This is test2 print %s \n", print_str);
} 在没有Makefile的情况下,我们这样子编译整个工程生成一个可执行程序main
gcc -c main.c   # 生成main.o 目标代码
gcc -c test1.c  # 生成test1.o 目标代码
gcc -c test2.c  # 生成test2.o 目标代码
gcc -o main main.o test1.o test2.o  # 生成名为main的可执行文件

./main  # 执行就能看到输出结果了 而Makefile就是用来说明这样一种关系的,看看我们怎么样用Makefile来达到同样的效果: Makefile
main:main.o test1.o test2.o
gcc -o main main.o test1.o test2.o

main.o:main.c test1.h test2.h
gcc -c main.c

test1.o:test1.c test1.h
gcc -c test1.c

test2.o:test2.c test2.h
gcc -c test2.c 有了这个Makefile之后,我们只需要在目录下执行
make 就生成了名为main的可执行文件
./main Makefile有三个非常有用的变量,$@; $^; $< :
$@ :目标文件
$^ :所有的依赖文件
$< :第一个依赖文件 于是简化后的Makefile变成了
main:main.o test1.o test2.o
gcc -o $@ $^

main.o:main.c test1.h test2.h
gcc -c $<

test1.o:test1.c test1.h
gcc -c $<

test2.o:test2.c test2.h
gcc -c $< 经过简化后是简单了一点,不过还不是最简,Makefile有一个缺省规则:
..c.o:
gcc -c $< 这个规则表示所有的.o文件都是依赖与之相应的.c文件的.例如test1.o依赖于test1.c 于是Makefile变成了
main:main.o test1.o test2.o
gcc -o $@ $^

..c.o:
gcc -c $< 然后make一下,发现了吧,这就Makefile的作用所在!关于Makefile,更多的可以查看相应文档
在linux下面,我们使用GNU的gcc编译器来编译C语言程序。关于gcc编译器,请查看: man gcc 下面就编写一个hello world吧,新建hello.c 内容如下: int main(int argc, char ** argv) { printf(“Hello world ! \n”); } 要编译这个程序,我们在命令行下执行: gcc -o hello hello.c -o 表示输出可执行文件 -c 表示输出目标代码 -g 表示加入调试信息 gcc编译器就会为我们生成一个名叫hello 的可执行文件 ./hello 执行就能看到程序输出的hello world 了
git config --global user.name "robbin"
git config --global user.email "fankai@gmail.com"
git config --global color.ui true
git config --global alias.co checkout
git config --global alias.ci commit
git config --global alias.st status
git config --global alias.br branch
git config --global core.editor "mate -w"    # 设置Editor使用textmate
git config -l  # 列举所有配置
用户的git配置文件~/.gitconfig
git help <command>  # 显示command的help
git show            # 显示某次提交的内容
git show $id

git co  -- <file>   # 抛弃工作区修改
git co  .           # 抛弃工作区修改

git add <file>      # 将工作文件修改提交到本地暂存区
git add .           # 将所有修改过的工作文件提交暂存区

git rm <file>       # 从版本库中删除文件
git rm <file> --cached  # 从版本库中删除文件,但不删除文件

git reset <file>    # 从暂存区恢复到工作文件
git reset -- .      # 从暂存区恢复到工作文件
git reset --hard    # 恢复最近一次提交过的状态,即放弃上次提交后的所有本次修改

git ci <file>
git ci .
git ci -a           # 将git add, git rm和git ci等操作都合并在一起做
git ci -am "some comments"
git ci --amend      # 修改最后一次提交记录

git revert <$id>    # 恢复某次提交的状态,恢复动作本身也创建了一次提交对象
git revert HEAD     # 恢复最后一次提交的状态
git diff <file>     # 比较当前文件和暂存区文件差异
git diff
git diff <$id1> <$id2>   # 比较两次提交之间的差异
git diff <branch1>..<branch2> # 在两个分支之间比较
git diff --staged   # 比较暂存区和版本库差异
git diff --cached   # 比较暂存区和版本库差异
git diff --stat     # 仅仅比较统计信息
git log
git log <file>      # 查看该文件每次提交记录
git log -p <file>   # 查看每次详细修改内容的diff
git log -p -2       # 查看最近两次详细修改内容的diff
git log --stat      # 查看提交统计信息
Mac上可以使用tig代替diff和log,brew install tig
git br -r           # 查看远程分支
git br <new_branch> # 创建新的分支
git br -v           # 查看各个分支最后提交信息
git br --merged     # 查看已经被合并到当前分支的分支
git br --no-merged  # 查看尚未被合并到当前分支的分支

git co <branch>     # 切换到某个分支
git co -b <new_branch> # 创建新的分支,并且切换过去
git co -b <new_branch> <branch>  # 基于branch创建新的new_branch

git co $id          # 把某次历史提交记录checkout出来,但无分支信息,切换到其他分支会自动删除
git co $id -b <new_branch>  # 把某次历史提交记录checkout出来,创建成一个分支

git br -d <branch>  # 删除某个分支
git br -D <branch>  # 强制删除某个分支 (未被合并的分支被删除的时候需要强制)
git merge <branch>               # 将branch分支合并到当前分支
git merge origin/master --no-ff  # 不要Fast-Foward合并,这样可以生成merge提交

git rebase master <branch>       # 将master rebase到branch,相当于:
git co <branch> && git rebase master && git co master && git merge <branch>
git diff > ../sync.patch         # 生成补丁
git apply ../sync.patch          # 打补丁
git apply --check ../sync.patch  # 测试补丁能否成功
git stash                        # 暂存
git stash list                   # 列所有stash
git stash apply                  # 恢复暂存的内容
git stash drop                   # 删除暂存区
git pull                         # 抓取远程仓库所有分支更新并合并到本地
git pull --no-ff                 # 抓取远程仓库所有分支更新并合并到本地,不要快进合并
git fetch origin                 # 抓取远程仓库更新
git merge origin/master          # 将远程主分支合并到本地当前分支
git co --track origin/branch     # 跟踪某个远程分支创建相应的本地分支
git co -b <local_branch> origin/<remote_branch>  # 基于远程分支创建本地分支,功能同上

git push                         # push所有分支
git push origin master           # 将本地主分支推到远程主分支
git push -u origin master        # 将本地主分支推到远程(如无远程主分支则创建,用于初始化远程仓库)
git push origin <local_branch>   # 创建远程分支, origin是远程仓库名
git push origin <local_branch>:<remote_branch>  # 创建远程分支
git push origin :<remote_branch>  #先删除本地分支(git br -d <branch>),然后再push删除远程分支
git remote -v                    # 查看远程服务器地址和仓库名称
git remote show origin           # 查看远程服务器仓库状态
git remote add origin git@github:robbin/robbin_site.git         # 添加远程仓库地址
git remote set-url origin git@github.com:robbin/robbin_site.git # 设置远程仓库地址(用于修改远程仓库地址)
git remote rm <repository>       # 删除远程仓库
git clone --bare robbin_site robbin_site.git  # 用带版本的项目创建纯版本仓库
scp -r my_project.git git@git.csdn.net:~      # 将纯仓库上传到服务器上

mkdir robbin_site.git && cd robbin_site.git && git --bare init # 在服务器创建纯仓库
git remote add origin git@github.com:robbin/robbin_site.git    # 设置远程仓库地址
git push -u origin master                                      # 客户端首次提交
git push -u origin develop  # 首次将本地develop分支提交到远程develop分支,并且track

git remote set-head origin master   # 设置远程仓库的HEAD指向master分支
也可以命令设置跟踪远程库和本地库
git branch --set-upstream master origin/master
git branch --set-upstream develop origin/develop
we create a collection with limited size 100000: > db.createCollection(“colcase1”, {capped:true, size:100000}) { “ok” : 1 } > show collections colcase colcase1 system.indexes > and, we can convert a exist collection to a limited one: > db.colcase.isCapped() false > db.runCommand({“convertToCapped”:”colcase”,size:100000}) { “ok” : 1 } > db.colcase.isCapped() true > Look ! we did it
unload a picture:
